Is your patio heater not lighting up like it used to? The culprit might be a dirty pilot tube.
When your pilot tube gets clogged, it stops gas from flowing properly, leaving you in the cold. But don’t worry—you can fix this yourself with just a few simple steps. In this guide, you’ll learn exactly how to clean your patio heater’s pilot tube quickly and safely.
Keep reading to bring the warmth back to your outdoor space without any hassle.
Tools Needed
Cleaning the pilot tube on a patio heater requires specific tools. Using the right tools makes the job easier and safer. Preparing these tools before starting saves time and effort.
Safety Gloves
Safety gloves protect your hands from dirt and sharp edges. They keep your skin safe during cleaning. Always wear gloves to avoid cuts and burns.
Compressed Air Can Or Air Compressor
Compressed air helps clear dirt and debris inside the pilot tube. It blows out blockages quickly and safely. Use short bursts of air for best results.
Small Wire Brush
A small wire brush scrubs the inside of the pilot tube. It removes stubborn dirt and soot. Choose a brush that fits the tube size.
Needle Or Thin Cleaning Tool
A needle or thin tool clears tiny holes in the pilot tube. It helps remove clogs that block gas flow. Be gentle to avoid damage.
Wrench Set
A wrench set loosens and tightens fittings on the patio heater. Use the right size wrench to avoid stripping nuts. Keep the heater parts secure after cleaning.
Soft Cloth
A soft cloth wipes away dirt and dust from the tube surface. It also cleans other parts after brushing. Use a clean cloth for a neat finish.

Credit: www.comuntia.org
Safety Precautions
Cleaning the pilot tube on a patio heater requires careful attention to safety. Small mistakes can lead to accidents or damage. Following safety steps protects you and your heater. Always prepare your workspace and tools before starting.
Turn Off The Gas Supply
Always shut off the gas supply before cleaning. This stops gas leaks and reduces fire risk. Wait a few minutes after turning off the gas. This allows any leftover gas to clear from the system.
Work In A Well-ventilated Area
Choose an open space or well-ventilated room for cleaning. Fresh air prevents gas buildup and reduces harmful fume risks. Avoid enclosed spaces with poor airflow. This ensures your safety during the cleaning process.
Use Protective Gear
Wear safety gloves to protect your hands from dirt and sharp parts. Use safety glasses to shield your eyes from dust and debris. This gear keeps you safe and comfortable while working on the heater.
Check For Gas Leaks After Cleaning
Inspect all connections and the pilot tube for leaks after cleaning. Use a soapy water solution on joints and look for bubbles. Bubbles mean a gas leak. Fix leaks before using the heater again.
Avoid Open Flames During Cleaning
Never use matches or lighters near the patio heater during cleaning. Even small sparks can ignite gas. Wait until the area is clear and safe before lighting the heater.
Locate The Pilot Tube
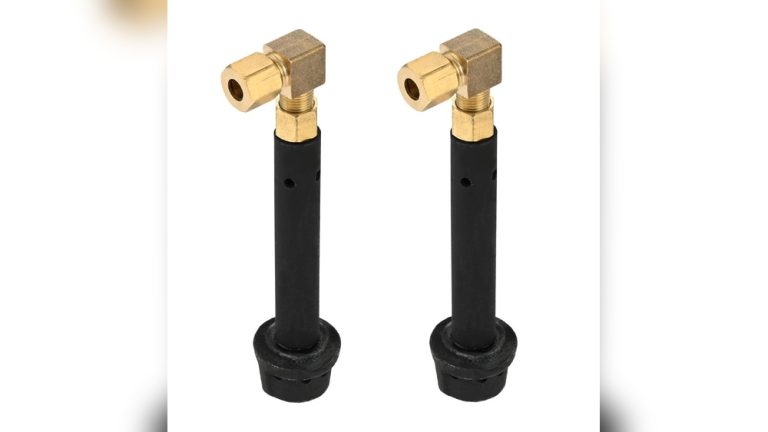
The pilot tube is a small but important part of your patio heater. It helps light the main burner by delivering gas to the pilot flame. Cleaning the pilot tube keeps the heater working safely and efficiently.
Finding the pilot tube is the first step in cleaning it. It usually sits near the bottom of the heater, close to the burner. Knowing where to look makes the whole process easier and faster.
Check Near The Burner Assembly
Look closely at the burner area. The pilot tube is often a thin metal pipe or tube. It points toward a small opening where the pilot flame appears. This part is connected to the gas line.
Identify The Gas Supply Line
Trace the gas supply line from the control valve. The pilot tube branches off from this line. It is smaller than the main gas pipe. This helps you spot it quickly among other parts.
Look For The Pilot Flame Holder
The pilot tube ends at the pilot flame holder. This holder is a small metal piece near the burner. It keeps the pilot flame steady. Finding this will confirm the pilot tube’s location.
Turn Off The Heater
Turning off the patio heater is the first step before cleaning the pilot tube. It ensures safety and prevents accidents. Always make sure the heater is completely off and cool to the touch.
Working on a hot heater can cause burns or damage the parts. Waiting a few minutes after switching off lets the heater cool down. This makes cleaning easier and safer.
Locate The Power Source
Find where the heater connects to electricity or gas. Unplug the heater from the electrical outlet or turn off the gas supply. This stops any energy flow to the heater.
Confirm The Heater Is Off
Check the control knob and make sure it is in the “off” position. The pilot light should be out with no signs of flame. If unsure, wait longer before starting to clean.
Allow The Heater To Cool
Touch the heater carefully to test the temperature. The surface must feel cool before cleaning begins. This protects your hands and the heater’s parts from heat damage.
Remove The Pilot Tube
Removing the pilot tube is an important step to clean your patio heater safely. This part directs gas to the pilot light. Dirt or debris can block it and stop the heater from working well.
Taking out the pilot tube allows you to clean it properly. It also helps check for any damage or wear. Follow these clear steps to remove the pilot tube without trouble.
Turn Off The Gas Supply
Start by turning off the gas supply to your patio heater. This prevents gas leaks and keeps you safe. Locate the gas valve and switch it to the off position. Wait a few minutes before touching any parts.
Find the pilot tube near the burner assembly. It is a small metal tube connected to the gas line. The pilot light sits at the end of this tube. Use a flashlight if the area is dark.
Disconnect The Pilot Tube
Use a wrench to loosen the nut holding the pilot tube. Turn the nut counterclockwise carefully. Avoid bending or damaging the tube during removal. Once loose, gently pull the pilot tube away from the heater.
Clean The Pilot Tube
The pilot tube is a small but important part of your patio heater. It delivers gas to the pilot light. Over time, dirt and debris can clog it. Cleaning the pilot tube helps your heater work safely and efficiently. Follow these simple steps to clear any blockages.
Use Compressed Air
Start by blowing compressed air through the pilot tube. This removes loose dirt and dust quickly. Use a can of compressed air or an air compressor. Hold the tube carefully and aim the air inside. Repeat a few times to clear the passage.
Use A Thin Wire
If compressed air is not enough, try a thin wire. A small piece of wire or a straightened paperclip works well. Gently push the wire through the tube to remove stubborn debris. Do not force it hard to avoid damage. Move it back and forth to clean thoroughly.
Apply Cleaning Solution
For tougher blockages, use a mild cleaning solution. Mix warm water with a little dish soap. Dip a cotton swab or small brush in the solution. Carefully clean the inside of the pilot tube. Rinse with clean water and dry completely before use.
Reinstall The Pilot Tube
Reinstalling the pilot tube on your patio heater is an important step after cleaning. It helps ensure your heater lights properly and works safely. Take your time to place the tube correctly. This prevents gas leaks and keeps the flame steady.
Align The Pilot Tube Properly
Start by positioning the pilot tube back in its spot. Make sure the tip points toward the burner. This directs the flame to ignite the gas correctly. Check that the tube fits snugly without gaps or bends.
Secure The Pilot Tube With Screws
Use the screws removed earlier to fix the pilot tube. Tighten them gently but firmly. Loose screws can cause movement and block the gas flow. Avoid over-tightening to prevent damage to the tube.
Reconnect The Gas Line To The Pilot Tube
Attach the gas line carefully to the pilot tube. Ensure the connection is tight and secure. Use a wrench to fasten the fitting, but do not force it. A proper seal avoids gas leaks and keeps the heater safe.
Test The Pilot Light After Reinstallation
Turn on the gas supply and ignite the pilot light. Watch the flame for a steady blue color. A flickering or yellow flame means the tube may be misaligned. Adjust the pilot tube if needed and test again.
Test The Heater
Testing the patio heater after cleaning the pilot tube is important. It checks if the cleaning worked. It also helps find any other problems early. Testing keeps the heater safe and efficient.
Turn On The Gas Supply
Open the gas valve slowly. Listen for any hissing sounds. This shows gas is moving to the heater. If no sound or smell of gas appears, stop and check connections.
Ignite The Heater
Press the ignition button or use a lighter. Watch the pilot light carefully. It should ignite quickly and stay steady. A flickering or weak flame means more cleaning may be needed.
Observe The Pilot Flame
The flame should be blue with a small yellow tip. A mostly yellow flame suggests dirt or blockage. Make notes if the flame looks uneven or weak. This helps decide if another cleaning round is required.
Check For Gas Leaks
Smell around the pilot and connections for gas. Use a soapy water solution on joints to spot bubbles. Bubbles mean a leak. Turn off the gas and fix leaks before using the heater again.
Test Heater Operation
Once the pilot is steady, turn the main burner on. The heater should light smoothly. The flame should be steady and bright. If it goes out or sputters, inspect the pilot tube again.
Regular Maintenance Tips
Regular maintenance keeps your patio heater working well. Cleaning the pilot tube is key for safety and efficiency. Dirt or blockages can stop the heater from lighting. Follow these simple tips to maintain the pilot tube.
Turn Off Gas And Let Heater Cool
Always switch off the gas supply before cleaning. Wait until the heater is completely cool. This prevents accidents and burns.
Use Compressed Air To Clear Debris
Blow air through the pilot tube gently. This removes dust and small dirt pieces. Use a can of compressed air or a small air pump.
Clean With A Soft Brush
Use a soft brush to clean around the tube opening. Avoid hard brushes that could damage the tube. Brush away cobwebs and dirt carefully.
Check For Blockages Regularly
Look inside the tube for any blockages. Use a thin wire or needle to clear stuck debris. Be gentle to avoid bending the tube.
Inspect The Pilot Flame
Light the heater and watch the pilot flame. A steady blue flame shows the tube is clean. A weak or yellow flame means more cleaning is needed.

Credit: deerspa.com

Credit: waterheatertimer.org
Conclusion
Cleaning the pilot tube keeps your patio heater working well. Dirt and debris block the tube and stop the flame. Regular cleaning helps avoid this problem. Use simple tools and gentle steps to clean safely. Check the tube often for build-up or damage.
A clean pilot tube means a steady flame and warm outdoor space. Take a few minutes to clean it, and enjoy your heater longer. Simple care makes a big difference in performance.